

HOW TO EDIT SHAPES IN PHOTOSHOP 2019
Changing the shape of a polygon in Adobe Photoshop isn’t as intuitive as it could be.
But it can be done, and the process is fairly simple.
I’ll show you how to do this for a triangle.
First, find the Polygon tool. For me, this shows up on a toolbar on the left. (Toolbars can be moved around though, so this isn’t necessarily the case for you.)
 The icon might look different on your toolbar. It could be a rectangle, ellipse, line, or a star, depending on which form of the tool was used previously.
If it doesn’t look like a hexagon (that is, if it looks like a rectangle, ellipse, line, or a star), hold the cursor (left-click) on the shape tool until the other options show up. Choose the hexagon (which is the Polygon tool).
If you wish to make a triangle, enter 3 for the Number of Sides.
Set the width and height as desired.
 Place your cursor somewhere on the canvas, left-click once, and you should see a triangle.
 When the shape is selected, you should see another toolbar on the screen. This will let you adjust, for example, the fill color, the outline color, and the outline thickness.
 My fill was initially transparent, but then I changed it to red. I also changed the stroke (outline) color to black and decreased its thickness from 10 px down to 3 px. (You will see this later.)
Use whatever colors and thickness suit your needs. Try experimenting with them to see how this works. (If it doesn’t seem to be working, try inserting a new triangle after you adjust the settings.)
When you select the polygon, you see little markers on the corners (called the vertices). You can see these markers in the triangle shown above.
BUT… if you try to move these markers and the entire shape moves, you can easily get frustrated.
You want to click on the marker to move the marker, thereby changing the shape or orientation of the triangle. But the whole triangle simply moves without changing shape.
If that happens, don’t worry, there is a simple fix.
This happens when the object is selected using the Path Selection Tool, which is a black arrowhead like the one shown below.
 What you need to do is change this to the Direct Selection Tool, which is a white arrowhead like the one shown below.
 It’s tricky because they look very similar.
And because you don’t see both arrows on the main toolbar at the same time.
You need to left-click on the Path Selection Tool (the black arrowhead) by holding the left button down until both arrowheads appear, and then choose the white arrowhead instead.
The white arrowhead is the Direct Selection Tool.
Once you are using the Direct Selection Tool (the white arrowhead), grab the triangle, and it will let you move the markers.
(If it still doesn’t, try clicking outside of the shape, and then choosing the shape again, and it should finally let you.)
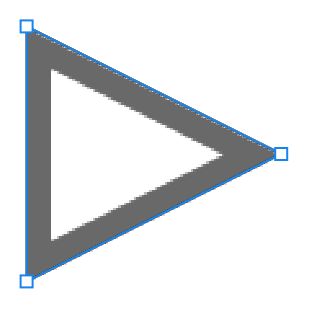
This is how I moved the markers on the corners to change the shape of my triangle like the one below.
 And then I changed the fill color, stroke color, and stroke thickness (as I mentioned earlier in the article).

Write Happy, Be Happy
Chris McMullen
Author of the Improve Your Math Fluency series of math workbooks and self-publishing guides

OMG…you’ve just reminded me why I never warmed to photoshop. Vector graphics is painful. Then again, I suppose me, trying to do ‘painting’ with Corel Draw is probably just as painful. One of these years I really will try to learn photoshop.
And you’ve just reminded me of Corel Draw. 🙂 It’s been a while since I’ve played with that.
I don’t have the latest version, still using Draw 8, but it’s been invaluable for covers. I suspect I’m more draftsman than artiste. 😀
Thanks, Chris. 🙂 — Suzanne
You’re welcome, Suzanne. 🙂