Marketing Books with QR Codes

author-2

QR Codes

Why should you care about them?

Three good reasons:

  • Humans are more likely to pursue an option that allows them to be lazy. Extra work deters sales.
  • People can easily make mistakes when typing a website address. Typos cost sales.
  • Many of your potential customers are into the latest technology. Give them an opportunity to play with their toys.

QR codes make it easy for your customers to find your Author Central page, book’s product page at Amazon, Facebook author page, Twitter page, WordPress blog, Goodreads author page, or other websites.

What Is a QR Code?

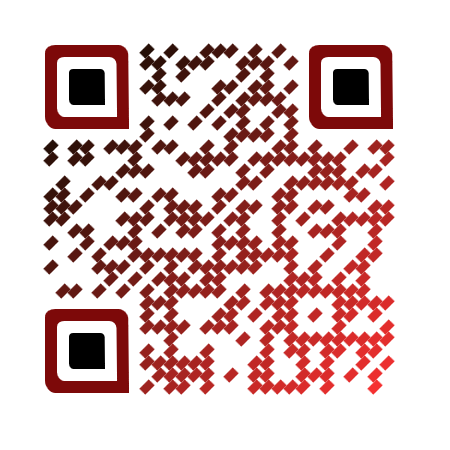
A QR code is a two-dimensional barcode. QR stands for Quick Response.

It’s very common in the consumer industry for a QR code to contain the information for a website url.

You can see a sample QR code above in the image I used for this post.

Here’s how the QR code works:

  • You visit a website that allows you to generate a QR code for your website. Some QR websites do this for free.
  • Then you download the JPEG or PNG file for your QR code.
  • Include your QR code on your book marketing materials.
  • Smartphone users can download free apps that scan QR codes.
  • The customer uses the QR scanner on his/her smartphone to scan the QR code. It’s just the phone’s camera reading the QR code.
  • When the QR code is scanned, the phone’s browser opens the website address associated with the QR code.
  • You can even track statistics associated with QR code scans, which is great for marketing.

Quick and Easy

Really, it’s incredibly easy.

If you have a smartphone, you just open the app, which opens your phone’s camera, point the camera at the QR code, and that’s it. The phone beeps, the phone’s internet browser opens, and the webpage appears on the phone.

Many smartphone owners have already installed free apps on their phones to scan QR codes. Many people recognize QR codes when they see them and scan them.

If you’ve never scanned a QR code before, what are you waiting for?

  • Get your cell phone out and search for apps.
  • Type QR code into the search query. Browse for free QR scanners.
  • I have an android phone. I tried a few. I like one called QR Droid.
  • Install the QR scanning app on your phone.
  • Test it out. You can scan the QR code above if you like (it will take you to my Amazon author page). Or the next time you buy a soft drink in a fast food restaurant, see if there is a QR code on the cup.

It’s just as easy for authors to generate free QR codes to help market their books. You just find a free website, enter your website url, and download an image file with your QR code.

Marketing with QR Codes

There are several websites that specialize in generating QR codes. Many offer free QR codes. Many allow you to track statistics.

I tried scanova.io and really liked it. I tested out Scanova and some other popular QR generators, and found Scanova most suitable for my needs.

When searching for a QR code generator, consider these features:

  • Will customers see advertisements on your website? Some of the generators require you to pay a monthly fee to avoid this.
  • Do the QR codes work reliably? Make a free one and test it out.
  • Do they offer free tracking of statistics?
  • How many trackable QR codes can you get?
  • How many trackable QR codes do you need?
  • Do they offer color or visual QR codes?
  • Is there a limit to how many QR scans customers can do per month? Some charge a fee to raise or remove this limit.
  • One of the fancy paid QR services that I explored in my research offered you the chance to create a QR code that goes to one page that shows your website, Facebook, blog, Twitter, etc. It was an all-in-one page. Of course, you could create your own free webpage somewhere and put all this together on that page, then use a free QR code to go to that page instead of paying for this special feature.

Don’t like the way QR codes look? Not a problem. Scanova and other QR code generators offer visual QR codes. You upload an image, such as a logo, and they turn it into a visual QR code.

Plain QR codes are more likely to be instantly recognized as QR codes, and it’s possible that they will be easier to read. You can test out a visual QR code and a plain one to compare them.

Book Marketing

You want customers to visit your author page, blog, social media sites, Amazon product page, etc.

So make it easy for the customer to do this. That’s what QR codes are for. Why type that url when you can just scan it.

Online, the customer would simply click on the link. That’s easy. But what about when it’s not online?

Anytime you print your url, add your QR code, too:

  • On the author page of your print book, include the QR codes to your WordPress blog, Facebook author, and Twitter pages.
  • When you print bookmarks for your book, add the QR code to the book’s product page at Amazon.
  • Add a QR code for your Amazon author page to your business cards.
  • Create flyers for a Goodreads giveaway or Rafflecopter contest. A QR code makes it easy to enter.
  • Send postcards to your client lists, notifying them (with a personal touch!) when your new book comes out—with a convenient QR code.

If you want to go overboard, you can even tattoo a QR code on your forearm or paint one on the door of your car! (Hey, you just might get the local news to make a story out of it for extra publicity.) Be sure to put a QR code on your pet’s id tag! 🙂

Really, you don’t have to do extra work to use QR codes in your book marketing. Just add a QR code to anything you’d ordinarily print, including your book, bookmarks, business cards, etc.

It’s free. It’s really not extra work. So why aren’t you using QR codes? What’s there to lose?

In addition to helping you generate additional traffic, QR codes offer tracking statistics. If you succeed in getting customers to scan QR codes that take them to your book’s product page at Amazon, you get tracking data that you wouldn’t ordinarily obtain.

Are QR Codes Dead or Alive?

I’m not saying that QR codes are so popular that everyone is scanning them, and that this is the easy solution to all your marketing woes.

What I am saying is that QR codes are easy to make, easy to use, and can help you generate additional traffic without much extra work.

Who can’t use extra traffic without extra expense and with very little work?

QR codes are in use. Many big-name fast food restaurants include QR codes on their disposable products, such as soda cups. Big retailers are keeping QR codes alive. You can take advantage of this.

There are alternatives to QR codes, but again, there are many people who recognize and use QR codes, you can make them for free, it makes it easy for customers to find your website, it offers you tracking data, and it requires almost no work to take advantage of this free marketing resource.

You

That’s right! You! 🙂

What can you do?

Install a free QR scanner on your smartphone.

The next time you come across an author’s QR code and you’re curious about the author or the author’s book, scan the QR code and check out the website.

Chris McMullen

Copyright © 2014 Chris McMullen, Author of A Detailed Guide to Self-Publishing with Amazon and Other Online Booksellers

  • Volume 1 on formatting and publishing
  • Volume 2 on marketability and marketing

Follow me at WordPress, find my author page on Facebook, or connect with me through Twitter.

Comments

Click here to jump to the comments section:

https://chrismcmullen.wordpress.com/2014/07/13/marketing-books-with-qr-codes/#comments

Master Page Numbers in Microsoft Word 2010

Page Numbers


Introduction

There are several problems that one must solve when numbering pages in Word, and this can be the source of much frustration:

  • You change the page number on one page, and it changes the style or numbering on one or more other pages.
  • You insert a page number on a page, but the formatting doesn’t match that of the other pages.
  • You try to make the front matter have Roman numerals, but all the page numbers switch from Arabic to Roman.
  • You discover that the same page number appears twice in a row.
  • You add page numbers and the file freezes on you. Worse, it won’t open back up.

WHY doesn’t it work? WHY can’t it just be easy?

Calm down. Take a deep breath.

It is possible to number the pages exactly how you want them. The problem is that the way to do it isn’t intuitive. You have to use section breaks, and you have to implement the page numbering a certain way.

If you follow the procedure that Word is looking for, you can master pagination in Microsoft Word.


Before We Begin

Microsoft Word is somewhat more prone to file freezing or corruption when making changes to page numbering.

What does this mean to you?

It means you should back up your file before you edit Word’s pagination.

Save your file with a new filename (like Book v2.docx) and save it in two different places (like jump drive and email). If you’ve already spent months typing hundreds of thousands of words for a book, the worst that can happen is that you have to start over… unless you wisely back up your file in multiple places.


Procedures

Follow these steps in Microsoft Word. This outline is specifically for the 2010 version, but 2007 and 2013 are nearly identical and 2003 follows the same ideas (but the toolbars are different).

A picture is worth a thousand words, right? At the end of the procedures you can find some screenshots of the key steps.

  1. Insert a section break anywhere you want the style of page numbering to change. For example, if you want to number your first page on the fifth page of your manuscript, you need a Next Page section break at the end of the fourth page. If you’d like to switch from Roman numerals (v, vi, vii, viii, ix, x) to Arabic numbers (11, 12, 13) on the eleventh page, insert a Next Page section break at the end of the tenth page. Remove the ordinary page break (if that’s what you have presently) and instead go to Page Layout > Breaks > Next Page to insert a section break instead of an ordinary page break. This section break tells Microsoft Word that you wish to change the header or footer style (your page numbers are either part of the header or footer, depending on where you place them).
  2. Press the Show/Hide button (it looks like ) on the Home toolbar. This will help you identify page breaks, section breaks, and blank lines, for example. (If your page numbers aren’t lining up between different sections, this will help you see if you accidentally pressed the Enter key while formatting the page numbers in one of the sections, for example.)
  3. Start at the very beginning of your Word document and work your way forward one section at a time. Very often, sections link to previous sections (though you can choose to unlink them), so if you make changes to one section, it often affects every section that follows (sometimes it also affects previous sections). Problems are best minimized by starting at the beginning and working forward one section at a time. After you make any change, immediately review all the previous sections to double-check that none of the previous page numbers have changed. You can save a great deal of frustration by nipping problems in the bud. It’s worth checking. It might seem like it’s a lot of extra work, but in the long run it might be much less work.
  4. If you don’t already have page numbers, go to the page where you’d like to add them and find Page Numbers on the Insert toolbar. Choose one of the options (it’s possible to customize it after inserting them); the simpler options are less likely to result in freezing or file corruption, but nothing is foolproof. Return to the same place and click Format Page Numbers. This gives you the option to change the starting number, continue from the previous section, or change the style from Roman numerals to Arabic numbers, for example. You can highlight the page number and change the font size or style. You can also place your cursor just before or after the page number and type characters (such as ~ to make your page numbers look like ~17~).
  5. You can remove page numbers the same way as you add them. Just go to Insert > Page Numbers > Remove Page Numbers.
  6. Remember to check the previous sections each time you add, remove, otherwise make changes to page numbers. You don’t want previous sections to change. It’s okay if following sections get changed; you’ll be able to correct that once you get to those later sections. If previous sections do change, hit the Undo button at the top of the screen (what a handy button!). Then you need to unlink the current section from the previous section before trying to make these changes. See the next step.
  7. The magic button is called Link to Previous. It’s actually a checkbox. Simply place your cursor in the page number area to open the Design toolbar for page numbers. Uncheck the box to remove the Same As Previous flag and that will allow you to modify the current page numbers without affecting previous page numbers. (Changes you make might affect page numbers in following sections, but that’s okay—you’ll be able to fix those when you get there. It’s the previous sections that you need to check on repeatedly. You don’t want previous sections to change.) Sometimes you do want the current section to follow the same style and numbering as the previous section. In these cases, you want the Link to Previous checkbox to be checked.
  8. When you want a new section to have different page number formatting from the previous section, remember to uncheck the Link to Previous box and verify that the Same As Previous flag disappears before making the changes. Otherwise, previous sections will change, too. It’s easy to forget. Remember also to go back and check all the previous sections anytime you make changes. Once in a while, a previous section (sometimes, it’s way back) changes even though the Link to Previous box is unchecked. So it pays to check. Also, remember to insert a Next Page section break (see Step 1) instead of an ordinary page break anywhere you’d like to make changes to the page numbering style. Not sure if you have a section break where you need it? See Step 2.
  9. Place your cursor in the page number area on a given page to open the Design toolbar. Two of these options can be quite useful. One is the option to have different page number styles on odd and even pages. For example, this helps you place page numbers near the outside edges, which would be the right side for odd-numbered pages and the left side for even-numbered pages. Another option is to have a different style on the first page of each chapter. Many books don’t number the first page of the chapter, so this option allows you to remove the page number from the first page of each section without disturbing the other pages. Well, if you suddenly remove the page number from the first page of the chapter, you may need to go in and reinsert the page numbering on subsequent pages of the same chapter (in addition to just checking the box for a different first page).
  10. Note that the two-page view in Word does NOT show you an actual book view. In a real book, such as one you self-publish at Amazon using CreateSpace, odd-numbered pages appear on the right-hand side and even-numbered pages show up on the left-hand side. Word shows it backwards. Just ignore the way that Word shows it; don’t try to adjust your page numbering based on Word’s incorrect two-page view. If you would like to see how your book will really look, save your file as a PDF file and open it with Adobe Acrobat Reader (you can get the Reader for free from Adobe’s website). Then go to View > Page Display > Show Cover Page in Two Page View, then View > Page Display > Two Page View.
  11. If you’re having trouble getting two different sections to display page numbers the same way, try clicking the Show/Hide Codes button (see Step 2) and comparing the formatting marks in both sections. Also check the settings in the Page Setup Dialog Box (click the funny-looking, arrow-like icon in the bottom right of the Page Setup group on the Page Layout toolbar to open this dialog box); check all three tabs there—Margins, Paper, and Layout. Especially, check the From Edge values in the Layout tab (which should be the same for every section if it’s applied to the Whole Document).
  12. You can change the position of page numbers relative to the body text using the From Edge values (see Step 11). The right combination of margins and From Edge values should allow you to get the body text and page numbers to look exactly how you want them to appear.
  13. Note that headers and footers are set differently. For example, if you unlink one section’s header from the previous section, the footer may still be linked to the previous section. So, for example, if you have both page headers at the top and page numbers in the footer below, unlinking the page numbers won’t unlink the page headers. This is important to keep in mind when you’re trying to format both headers and footers in the same document.
  14. If at first you don’t succeed, vent some of your frustration, get some rest and relaxation, and try again. See the suggestion in Step 15.
  15. Unfortunately, once in a while Word seems to go haywire. That is, you’re sure did everything right, but it doesn’t seem to be working. Sometimes, it helps to undo the last change, remove the section break, reinsert the section break, and then try again. It’s also possible for a Word file to become corrupt, in which case it’s best to start over with your back-up file. Didn’t back it up like I recommended? Ouch!
  16. If you just can’t hammer the square peg through the round hole, there is an alternate solution, which can really come in handy for self-published authors formatting books for print-on-demand services like Amazon’s CreateSpace. You can break your file up into smaller files. Before you do this, see if you can find a Word to PDF converter that allows you to join multiple PDF files together (e.g. Adobe Acrobat XI Pro offers a free trial period, and also offers a monthly subscription; Nuance PDF Converter Professional offers this feature; and there are also many free converters available on the internet). When you publish with CreateSpace or Ingram Spark, it’s best to submit a PDF anyway. If you’re able to join PDF files together, then you can break all the separate sections of your Word document into separate files. The trick is to ensure that all the page sizes, layout, and formatting is consistent across all of your files. Then you just need to get the page numbering right in each individual file, which is easier than getting it right in several different sections of a large file.
  17. If you’re also self-publishing an e-book, remember to remove page numbers (and all headers and footers) from the e-book version of your file.


Breaks

20140703_222956

Link to Previous

Show Codes Arrow

Page Setup Location

Page Setup

Page Headers, too

Headers and footers in general work the same way as pagination.

For example, if you would like to have even-page headers show chapter names and odd-page headers show the book title, you can do this by formatting the page headers the same way as page numbers are formatted. It’s also common to exclude the page header from some pages, such as some of the front matter and the first page of each chapter. It would be wise to see what header and page numbering styles are common for the type of book you’re publishing before you decide on the formatting.

Chris McMullen

Copyright © Chris McMullen, Author of A Detailed Guide to Self-Publishing with Amazon and Other Online Booksellers

  • Volume 1 on formatting and publishing
  • Volume 2 on marketability and marketing

Eradicate Negativity: Your Marketing Depends on It

Happy Sad

Negative vs. Positive

Reading should be a positive experience, right?

You want to create a positive shopping experience and a positive reading experience.

And writing is a positive experience, right?

(If not, why on earth are you doing it?)

So should publishing and marketing be positive.

But not everything and everyone you come across will seem positive.

And you will definitely encounter people and issues that will challenge you to stay positive.

  • Don’t let ’em bring you down.
  • Don’t let it make you negative.

You want to appear positive when you interact with potential readers. Even with fans.

The best way to appear positive is to be positive.

  • It’s easy to fall into a negative mindset.
  • It’s often not easy to stay positive.

But it’s so worth consciously working toward this. You can do it. 🙂

Author Branding

You’re striving to build a positive image as an author.

A critical review will challenge you to remain positive.

Cynics will challenge you.

Failed authors will challenge you.

Many people and occasions will challenge you to stay positive.

Don’t appear negative on your blog, in person, on social media, or anywhere.

  • What will readers think if they read about you complaining about a review on your blog?
  • What will readers think if they see you behaving negatively on a discussion forum?

You’re in the public eye now. Your image is at stake.

  • What will readers think if they meet you and you appear very positive about your book?
  • What will people think if you always come across as positive, even when you’re dealing with adversity?

Win your battles to stay positive. Build a positive reputation.

Each challenge is an opportunity to shine.

It’s not just your book and image that matter.

  • If authors complain about Kindles and readers hear this, why would they want to buy one?
  • If authors complain about Amazon and readers hear this, does it make them want to shop for books?

Positive Marketing

Staying positive has its rewards:

  • Visualize a positive outcome. It helps motivate you to work toward your goals.
  • When your positive mindset is challenged, think of it as an important battle toward long-term success. Win this battle by staying positive and making positive decisions. Don’t let this battle turn you negative and impede your chances for a bright future.
  • You’re more likely to show confidence when you stay positive.
  • You’re more likely to put your best effort into something when you feel positive about the outcome.
  • When readers see your positivity, it impacts their buying decisions.

But challenged your positive mindset will be.

And in some cases, it won’t be easy. You’re likely to feel, “Come on! Not again! That’s more than enough,” but you just have to be that much more determined.

Think to yourself, “Bring it on. Is that the best you’ve got?” When you get through this battle, things will start going your way.

Negativity definitely has its disadvantages.

Interact with positive people. Add positive authors to your circles. Avoid negativity.

Chris McMullen

Copyright © 2014 Chris McMullen, Author of A Detailed Guide to Self-Publishing with Amazon and Other Online Booksellers

Follow me at WordPress, find my author page on Facebook, or connect with me through Twitter.

Comments

Click here to jump to the comments section:

https://chrismcmullen.wordpress.com/2014/06/29/eradicate-negativity-your-marketing-depends-on-it/#comments

Most Valuable Marketing Tools for Self-Published Authors

Tools

1 Word of Mouth

What it can do for you:

  • It can generate sales even when you’ve had a couple of recent unfavorable reviews. What a reader’s buddy tells them about your book carries more weight than what some random stranger writes on your Amazon product page.
  • It doesn’t rely on Amazon to sell your book through search results or customers-also-bought lists. Those can change over time. Word-of-mouth sales can yield traffic during times when Amazon’s marketing isn’t helping your book.
  • It helps your book get discovered. Instead of having to hunt your book down amongst thousands of others in that genre, your book is reaching readers’ ears directly.
  • It lends credibility to your book. Somebody that readers trust is recommending your book.
  • It gets readers interested in your book and puts them in a positive frame of mind at the outset. Readers discovering your book on Amazon often approach it with concern.
  • It can lead to a very long-term chain reaction. A few readers hear good things about your book. It may take weeks for them to buy and read your book. If each of them recommends it to their buddies, the number of readers and recommenders has grown. Many months later, what starts out small can lead to something much bigger.
  • It can build your reputation as an author. This helps not only to sell one book, but to generate interest in your full line of books.

Word-of-mouth sales can be the most valuable, but also the hardest to get.

How to earn them:

  • Your book has to have a wow-factor. When strangers pick up your book and feel impressed with the read, you really have something. Your book’s strengths need to compel readers to want more of that. Give readers more than they expect; much more.
  • Fiction books need to evoke strong emotions in readers; they need to also deliver on readers’ expectations for the genre. Nonfiction books need to fulfill the range and depth of information that readers want; they also need to be well-organized, communicate ideas clearly, and present the information at the right level.
  • You need to shore up your book’s weaknesses. Even if the storyline or characters are incredible, readers find it hard to recommend books with editing, formatting, or other issues. Their reputation is on the line, too, in the recommendation. Your book needs to earn it. You’re charging money for your book; it needs to appear professional.
  • If your book has that wow-factor, get it into the hands of readers. Run promotions, find bloggers who review books in your genre, and find and interact with your target audience. Find experts to read your book and politely request an editorial review or a quote that you can use in your book’s blurb—that’s a professional recommendation that carries weight with some customers.

When the author goes the extra mile to impress readers and produces a book worthy of word-of-mouth praise, this can have a huge impact on the long-term success of the book.

2 The Horse’s Mouth

What’s the next best thing to hearing positive things about a book from a trusted source?

Interacting directly with the author, of course.

Even in today’s world where millions of authors are getting books out there, it’s still a treat to meet and interact with the author.

Why does it matter? This personal interaction can do things that your product page can’t:

  • Show your passion and enthusiasm for your book.
  • Make the reader feel special. Don’t just draw interest in your book. Get interested in your readers, too.
  • There is greater potential to establish credibility as an author.
  • Answer any questions that the reader has.

Of the most common ways for books to sell, personal interactions with the target audience is the one big factor that is most accessible to self-published authors. (The other big factors include shopping the bestseller list, shopping by the name of an established author, browsing through the gigantic haystack of books on Amazon, professional book reviews, and bookstore recommendations.) When you aren’t dealt a good hand, you better play the one good card you do have. If you do play your cards right, you can eventually benefit from the other popular ways that books sell, too.

Think long and hard about where to find your target audience. Go out and interact with them. Charm your potential readers.

While you can reach greater numbers online, interactions in person are more likely to result in sales and reviews.

3 Flash It

Your book needs attention.

Shoppers will be browsing through hundreds of thumbnails in search results. Others will see your cover when they come across your marketing efforts.

Your cover needs to stand out.

It also needs to look the part. If it looks like a mystery, but it’s really a fantasy, your sales will be a bad romance.

A fantastic cover won’t provide long-term success for a lousy book.

But a fantastic cover can have a significant impact on the sales of a quality book.

For a highly marketable book (i.e. there is demand for the book and the content delivers on expectations), investing a modest amount toward a fantastic cover can pay nice dividends in the long run. And what you might lack in terms of financial investment, you can make up for in time. After all, time is money. Take the time to learn the how-to, get feedback, and get it right.

There are no guarantees in the publishing business, but most successful self-published authors credit their covers for being valuable players on their books’ sales teams.

4 Talk to Me, Baby

An effective cover grabs the attention of the target audience and brings shoppers to the product page.

Now it’s time for the only salesperson you have at the point-of-sale to close the deal.

“Who’s that,” you ask? It’s your blurb.

The description of your book isn’t a summary. It’s a sales tool.

The blurb needs to attract attention right off the bat. It needs to engage interest in the first line and hold that interest until the customer clicks to Look Inside.

Many effective blurbs are very concise, especially in fiction. Too much text there can be intimidating. If you’re exploring hundreds of books, you don’t want to read a long description for a book you might not even buy. In nonfiction, you can make important points easy to read by using bullet points (such formatting is possible through Author Central).

If the reader gets bored, it’s no sale. If the blurb doesn’t reinforce the genre depicted by the cover and title, it’s no deal.

Once the blurb generates a click to Look Inside, the Look Inside needs to wow the customer into making the purchase. Like the blurb, the Look Inside needs to engage interest immediately and keep it throughout. It must also look professional and read well.

Finally, the book must deliver on the promise made by the cover, blurb, and Look Inside. Otherwise, you get returns and frustrated readers.

5 Hunt ’em Down

Your book is out there, but who knows it?

You want to find your target audience. The word for this is marketing.

A great cover and blurb help, but first people must find your book. Recommendations are great, but first people must read your book. First, you need to get your book discovered.

Paid advertisements probably won’t be cost-effective for marketing a single book. Unless you have an amazing promotion going on and you supplement the paid advertising with much free marketing. In that case, a BookBub (click the link to learn more) or other type of promotion may come in handy.

There are many free marketing strategies, which are often more effective for books than paid marketing. Blogging, Twitter, Facebook, and other social media sites help you build a following and interact with your target audience. The key words here are target audience, which means posting content that will be relevant for them, using appropriate hash tags, and finding relevant Facebook groups.

Social media is a slow process. Now you go from just getting your book discovered to getting your social media pages discovered. You can do this through months of effective posts, interacting with people in your target audience, and directing readers to your social media pages in an About the Author section in your book. Then you’re kind of going in circles. But your social media helps two ways: You want people to discover you and your book, and you also want to attract fans so you can tell them about your next book when it comes out.

Don’t forget old-fashioned media: newspapers, magazines, television, and radio. Local papers often have column inches to fill and local radio stations may have minutes of air time to fill. Think about what can make you interesting to their audience. You’re selling yourself to sell your book. Learn how to prepare a press release package.

Remember, personal interactions are valuable to self-published (and all) authors. See if you can put together a successful reading or signing. Visit local libraries to see if you can get a paperback copy in circulation there or volunteer to read (appropriate material) to kids or senior citizens (visit a senior citizen center, too). Try to get stocked in local bookstores, and antique and other kinds of stores that sell books, but don’t specialize in books.

You need to work hard to find your target audience. But you can also help your target audience find you. Over time, turn your blog into a content-rich website with nonfiction material (even if you write fiction) that will attract your target audience through search engines. Your goal is to get 100+ visitors daily to your site through relevant search engine queries after a year of posts. That’s a lot of people discovering you and your book. It starts out very slow, but if you do it right, it can be very effective toward long-term success.

6 Can’t Get Enough

It’s easier to market several similar books than it is to market a single book.

It’s also easier to buy a book from someone who looks like a committed writer. When readers try out new authors, they’re looking for someone with the potential to provide a lifetime of good reading. If you just have a couple of books out, there isn’t much potential reward even if the book turns out to be good (i.e. comparing a reader who likes your book to a reader who likes a book by an author who has a dozen books out, this second reader will be enjoying many more books).

You also look like a professional writer when you have several books out.

And then each book that you sell helps to sell your other similar books. A hot promotion on one book helps to sell all your other books. More books, more readers, more recommendations, multi-book sales… If you’re looking to grow your sales, you need to publish a full line of books.

Don’t try to build Rome in a day. Take your time and get your books right. Just look ahead to the future. Your long-term goal is to have several good books that all help one another. It won’t help at all to have several books out unless readers enjoy them.

Chris McMullen

Copyright © 2014 Chris McMullen, Author of A Detailed Guide to Self-Publishing with Amazon and Other Online Booksellers

Follow me at WordPress, find my author page on Facebook, or connect with me through Twitter.

Comments

Click here to jump to the comments section:

https://chrismcmullen.wordpress.com/2014/06/22/most-valuable-marketing-tools-for-self-published-authors/#comments

So Your Friend Is an Author…

Judge

Amazing, Isn’t It?

Yes. It is.

How many authors do you actually know?

Now your friend is one.

The key word there is friend.

This was your friend before. Becoming an author doesn’t change that.

Sure, you can tease your friend about this, if your relationship ordinarily involves teasing.

But your friendship is based on more than just teasing:

  • You support one another. Even if one of you writes a book.
  • You’re honest with one another. Even if you think the book isn’t quite, well, you know.
  • You know each other well. How to get on one another’s nerves. How to put things gently. So you can figure out the right way to share honest feedback.
  • You motivate one another. So in addition to honest feedback, you’ll provide encouragement, motivation, and direction.

Your friend wrote a book. That’s a huge accomplishment. Treat it as such.

There are some things you should know about writers:

  • Writing is a lonely process. Literally: Alone with the computer, writing. Marketing can be lonely, too. This same author, all alone, is reading reviews, which sometimes tear down the author’s hard work. Friends can remind that author that he or she isn’t alone. They can help the author handle criticism, and prevent the author from doing anything rash.
  • Once in a while, the author needs to be dragged outdoors into the real world, kicking and screaming. But if you try this when the author’s muse has just shown up after a long absence, it could prove to be a fatal mistake. You have to judge how vigorous the kicking and screaming is.
  • Writers can be a little eccentric at times. Your friend has some personality. You’ll be occasionally entertained. What’s not to like about this?

There are many ways that you can support an author (and still be honest and scrupulous):

  • Read the book, especially if it’s a kind of book that you’d normally be interested in. But if it’s not your kind of book, you can still support the author without reading it.
  • Help spread the word, especially if you’ve read the book and enjoyed it. But even a “Hey, my friend, Joe, just wrote a mystery” mention is valuable advertising for your friend. Most authors feel uncomfortable with the necessity of promoting their own books (even if they do this, they often feel uncomfortable doing so). Readers, also, sometimes put more stock in what someone else says about the book than the author’s own self-promotion. Gee, if only that author had some wonderful friends who could help spread the news… Hint, hint.
  • Do you know someone who read the author’s book? Ask that person to write an honest review. Authors need reviews, but asking for reviews of your own book… can look unprofessional (and again, authors can feel uncomfortable doing that). But an author’s friend, taking the initiative to do this (i.e. the author didn’t ask you to ask for reviews)… you could be that secret helping hand. You’d be like a superhero with a secret identity.
  • Follow the author’s blog, tweets, and Facebook posts. Encourage the author to keep separate Facebook pages for personal and authorship (e.g. there are author and book pages at Facebook). You should follow both. Expect to get tired of hearing about your author’s book. Don’t feel obligated to read and comment on every one of the author’s book-related posts. Your name is there. You participate occasionally. This means a lot.
  • If you have your own blog or website… just imagine if you mention the author’s book. Don’t even tell the author. Let him or her happen to come across it someday. “Wow! When did you do that? That’s so cool!”
  • Check out your friend’s product page at Amazon. Vote on reviews. Offer some feedback to the author on the cover, description, and Look Inside.
  • Visit local libraries and bookstores. Ask them why they don’t have this most amazing book right there on the shelf.
  • Attend a signing or reading. Encourage your author friend to do these. If you don’t feel like attending yourself, you can still help spread the word and encourage other people to attend.

Your friend spent months finding a little extra time each week, typing tens of thousands of words, massaging those words into a book. That’s no small achievement.

Your friend has considered agents, publishing houses, and self-publishing. There is no easy answer, no clear road to success. It’s a challenge.

Your friend is navigating the deep waters of marketing. It’s a strange world, but necessary to share the book with others. It’s daunting.

A little support from a friend would go a long way.

Mix that with some patience and understanding.

Remind the author that there is a real world here, which the author is part of… which the author needs to physically seem be a part of from time to time.

Remind the author that friendship works both ways. You have needs, too. It’s not just all about the author.

Throw in a little teasing, perhaps.

If your friendship survives authorship, it’s mean to last forever.

Copyright © 2014 Chris McMullen

Chris McMullen, Author of A Detailed Guide to Self-Publishing with Amazon and Other Online Booksellers

Follow me at WordPress, find my author page on Facebook, or connect with me through Twitter.

Comments

Click here to jump to the comments section:

https://chrismcmullen.wordpress.com/2014/06/17/so-your-friend-is-an-author/#comments

The Value of Your Book

Value Book

What’s Your Book Worth?

Your book. The idea you conceived, nurtured for months, and eventually gave birth to. The book you love and defend like it’s your baby. Thousands of words written passionately. That you slaved over. So that others might find some joy, entertainment, emotions, wisdom, or knowledge for your effort.

That book. What’s it worth?

It’s worth much more than any buyer will pay to read it.

Its value far exceeds the royalties that you will draw from it.

It’s definitely not worth any painful criticism.

So why do we writing artists suffer through months and years of labors to write books. Earning in many cases less royalty than the cost of a cup of coffee. Suffering sometimes harsh criticisms.

It’s because your book has value that extends well beyond royalties and reviews.

Your book has value as a work of art.

Your book has value to you as a complete and meaningful project. And a book is no small undertaking.

Your book has value to the niche audience who discovers it.

Art is meant to be shared, and finding your target audience, big or small, is a wonderful thing in and of itself.

Your story is a work of art. Craft it until you feel like it’s a masterpiece.

Frame it with editing, formatting, front matter, back matter, and a cover fitting the artwork.

Even your blurb and marketing are art forms. See the art in this and they become part of your passion, a hobby and not a chore.

Marketing isn’t advertising and business to the artist, it’s sharing your passion with others.

Art is the self-published author’s advantage.

We have no overhead. We’re not a business. We’re creating works of art to share with others.

Art’s value goes way beyond dollars. We create art for art’s sake. The rest is just gravy.

Copyright © 2014 Chris McMullen

Click here to jump to the comments section:

https://chrismcmullen.wordpress.com/2014/06/07/the-value-of-your-book/#comments

Formatting the Look Inside

Look Inside

Amazon’s Look Inside

Kindle Direct Publishing (KDP) offers previews for how your e-book may look on the Kindle, Kindle Fire, Kindle Fire HD, Paperwhite, iPad, iPhone… but not the Look Inside.

Yet prospective customers checking out your book on Amazon see your book’s Look Inside before making the purchase.

The Look Inside can significantly impact sales.

At the same time, Kindle authors tend to experience more formatting issues with the Look Inside than on the Kindle, Kindle Fire, and most other devices.

In fact, it’s not uncommon for a book to look great on a Kindle device, but format incorrectly in the Look Inside.

This problem plagues indie authors self-publishing their books on Kindle. Once they finally master Kindle formatting, the Look Inside is the last big hurdle.

In this article, we’ll explore how to format for the Look Inside. One example we’ll examine in detail is how to create non-indented paragraphs that don’t indent in the Look Inside.

Why Doesn’t the Look Inside Format Right?

Well, the technical answer involves a discussion about what is “right.” The Look inside is ultimately generated by a program following instructions. In the end, the Look Inside is “right.”

It often seems like the formatting is wrong when the author compares the original Word file with the Look Inside.

Some of the formatting that may look right in Word can get lost in translation on the way to the Look Inside.

The Look Inside sees a set of HTML instructions generated from the Word file.

Note: Even though you may submit a Word document to KDP, what the device reads is a set of HTML instructions that tell it what to display—ultimately, your submitted file is converted into a mobi file, which essentially contains a set of HTML instructions based on the Word file that you submit.

Often, what the Look Inside displays from reading those instructions differs from what Word displays on the screen.

What a Kindle, Kindle Fire, iPhone, iPad, Kindle for PC, and the Look Inside display on the screen can vary from the same set of HTML instructions generated from a Word file.

The Look Inside interprets the HTML more strictly, which is why the formatting is hardest to get right for the Look Inside.

From Word to Kindle

Kindle doesn’t see the Word document the way you do. It sees a set of HTML instructions.

The beginning of the HTML defines a set of styles used in your Word file. For example, there is a style for heading, subheading, titles, and a Normal style for the paragraphs of your body text.

Kindle (or iPad, or whatever device is being used) displays the different parts of your book according to these different styles.

If you highlight all or part of a paragraph and change the formatting of that text in Word, this carries over into the HTML.

Then the HTML says something to the effect, “Use the normal style, but change the indent size and add italics.”

This is where the Look Inside problems can begin. The Look Inside may format according to the style, and disregard some of those exceptions created by highlighting selected paragraphs. Other issues can arise from unclosed HTML tags.

The HTML generated from a Word file can get pretty messy, with all sorts of style exceptions built into the HTML, with <span> tags dispersed throughout, and with font settings redefined within the paragraph blocks. (You don’t want the file to define font size or style within the paragraph blocks. Not only can this cause formatting problems, but the device user expects to have control over these settings.)

Microsoft Word’s Styles

Much of the problem can be resolved by using Microsoft Word’s built-in style functions religiously. Modify the heading, subheading, title, and Normal styles to suit your needs.

Then make a new style that’s essentially a copy of the Normal style for paragraphs that need to be non-indented. I’m going to call this the NoIndent style just to give it a name.

When you’re modifying the styles, click on the Format button and adjust the Paragraph settings, too. Set the First Line indent for the Normal Style. It might be something like 0.2″ (since the common 0.5″ would be really large on a device with a small screen, especially an iPhone or the basic Kindle). Don’t use the tab key at all (and don’t use the spacebar to create indents). For the NoIndent style, set First Line to 0.01″.

Notes:

  • I specifically have Microsoft Word 2010 for Windows in mind. (Other versions may function similarly, though they can lead to important differences.)
  • If you set First Line to “none” or zero, it won’t work. Use 0.01″. (If you try to make it too small, it won’t take.)
  • Go to Special in the paragraph menu to find First Line, then set the By value next to it.
  • You see all the styles at the top of the screen, on the right side of the toolbar, in the home tab.
  • Right-click a style to modify it. When modifying the style, click the Format button to find the font and paragraph menus.
  • You can even build pagebreaks into the styles. Click Format, select Paragraph, then click the Line and Page Breaks tab. There is an option to pagebreak before. If you have pagebreaks that aren’t respected, try this (but realize that a Look Inside displayed as a single, scrolling page isn’t going to implement this).
  • To create a new style (for NoIndent, for example), click on the funny icon in the bottom-right corner of the styles menu on the home tab (the little icon is below the A’s where it says “Change Styles”). This will pull up a new window on the right side of the screen. Find the three buttons at the bottom of this window. Click the left button.

Apply the styles to sections of your document one by one. You can highlight a section and click the style, or you can place your cursor in a paragraph and click a paragraph style from the menu.

You want every block of text in your file to be associated with a particular style.

Except when you have to have different styles in the same paragraph (e.g. you wish to italicize, boldface, or underline specific text, or create subscripts or superscripts), you want the style to dictate the formatting. Go into the Font and Paragraph menus when modifying each style to create the formatting you want there. Don’t use the font and paragraph tools on the menu at the top of the screen to make these adjustments (except to adjust specific text, with something like italics, within the paragraph).

For example, set the linespacing in the paragraph menu by adjusting the style itself and applying the style to the text. Don’t do it by highlighting text and setting the linespacing.

Be sure to check the font menu when modifying each style (from the Format button). If you go into Advanced, you may find that Word’s defaults have adjusted the kerning for selected styles (you may or may not agree with these settings, so you should check them out). The font color should be automatic except when you need to apply a specific color to selected text.

You want to have a larger font size for headings and subheadings than the normal text, but you want to achieve this by setting the font size within each style. If you select text and apply a font size or style to the selected text, this causes problems when an e-reader interprets the HTML instructions for your file.

Check the “Automatically Update” box when modifying each style if you want changes to that style to be applied to text that has already been set to that style.

Word’s styles can get mixed up. What you want to do is start with a document as clean as possible (in the worst-case scenario, this can be achieved by cutting and pasting your document into Notepad and then back into Word). Then apply one style to every section to avoid any mix-ups.

Don’t select text and set specific font styles (e.g. Georgia). Don’t select whole paragraphs and set linespacing, indents, or other paragraph options. Instead, apply a specific style to those paragraphs. Make the paragraph adjustments in the style (for every paragraph of that style in your document), and apply the style to the paragraphs rather than modifying the paragraphs through the toolbar at the top of the screen (except by clicking the styles, like Title or Normal, found on that toolbar).

How to Create Non-Indented Paragraphs

Let’s work through a concrete example that plagues the Look Insides of many Kindle e-books.

Most traditionally published books don’t indent the first paragraph of each chapter. Popular novels do indent paragraphs, but not usually the first paragraph of the chapter. Check out several popular traditionally published print books. If you understand what I mean by “not indenting the first paragraph of the chapter” (see the two pictures below) you should observe that this is very common among those books.

Examine the two examples that follow. The first example has all of the paragraphs indented. The second example doesn’t indent the first paragraph of the chapter. The second example is very common among traditionally published books. However, it can be a challenge to implement this on the Look Inside. (Many traditionally published books put the first few words in CAPS in e-books, instead of using drop caps, as drop caps can format improperly on some devices. Tip: If you write fiction where this is common, try putting the first few words of your blurb in CAPS, too. I’ve seen this done effectively in the blurbs of some popular traditionally published books.)

IndentedNot Indented

Even if the first paragraph appears non-indented on the Kindle device, it may still appear indented on the Look Inside. But there are ways to get this right.

Let me illustrate the wrong ways first. Definitely, don’t use the tab key to indent some paragraphs, thinking this will correctly distinguish between which paragraphs are or aren’t indented. This might seem intuitive, but it doesn’t work (there will be inconsistencies). Similarly, don’t use the spacebar to create indents; it doesn’t work either.

Here is another wrong way. Better, but still wrong. If you highlight the first paragraph, click on the funny little icon in the bottom-right corner of the paragraph group on the home tab, change Special to First Line, and set By to 0.01″, it might not work. It will work on the screen and may work on most devices, but may not work on the Look Inside.

Here’s the problem. You can see the problem firsthand by looking at the HTML. You don’t need to know anything about HTML to peek at it and learn what’s going on. If you want to see Word’s HTML, Save As a filtered webpage (you want the one called Webpage, Filtered). Click Yes to the question that pops up. Find this new file on your computer (e.g. it might be in My Documents; it will be wherever you just saved it to). Right-click this HTML file and Open With Notepad.

When I adjusted the first paragraph’s indent the wrong way, as I outlined two paragraphs ago, the paragraph tag for the first paragraph looks like this:

<p class=MsoNormal style=’text-indent:.7pt’>

Compare this with the second paragraph:

<p class=MsoNormal>

You don’t have to know HTML to see the difference. Each paragraph sets the style to Normal. The first paragraph says to indent 7 points (0.01 inches).

The style=’text-indent:7pt’ setting will tell some devices to ignore the Normal style and indent the first paragraph 7 points (very little).

But the Look Inside may not accept this override. The Look Inside sees that you’re using the Normal style, which was previously defined to indent 0.2″. There are two different sets of instructions.

The better way is to provide a single set of instructions. That leaves less to interpretation.

This time, instead of highlighting the first paragraph and changing First Line from the home tab, I’m going to define a NoIndent style. I’ll do this by creating a new style based on the Normal style, and give it the name NoIndent (the last bullet in the section above called Microsoft Word’s Styles explains how). Then I’ll modify the NoIndent style (again, look for the bullets in the previous section for instructions). While modifying the NoIndent style, click Format, choose Paragraph, and set First Line there.

Now I simply place my cursor anywhere in the first paragraph and click the NoIndent style from the home tab. Prest-o, Change-o!

This time, the paragraph tag for the first paragraph looks like this:

<p class=MsoNoIndent>

Now this paragraph only has one set of instructions. When Amazon’s Look Inside reads the Kindle e-book, the class=MsoNoIndent statement will tell it to indent the paragraph according to the previously defined NoIndent style, which says to indent just 0.01 inches.

You can improve on this. Find the style definition for the NoIndent style in the beginning of the HTML file. Change 7pt or 0.01in (whichever it says) to 0 (that’s the number zero, not the letter O). This doesn’t work in Word, but it does work in the HTML file.

Notes:

  • Don’t open the HTML file in Word. Use Notepad to examine and modify the HTML.
  • If you have images in your file, you want to create a compressed zipped folder as explained in Amazon’s free guide, Building Your Book for Kindle.
  • Also look for span tags that include font definitions. If you remove these, be sure to remove the closing tags, too, which look like </span>. The Find tool can help you locate these.
  • Search for text-indent with the Find tool to see if any paragraphs are indenting through this setting instead of through a style definition.
  • Seemingly endless italics, boldface, or underline that’s not intended to be there may be caused by unclosed <i>, <b>, or <u> tags. For example, <i>italics</i> makes the word “italics” appear italicized. If the closing tag, </i> is missing (or typed incorrectly), the italics will keep going and going and going…
  • Other things you might look for are images. For example, instead of specifying the width and height in pixels, for large pictures that you’d like to fill the screen, you might remove the current width and height statements and replace them with width=”100%” (don’t set both the width and height this way; just set the width; however, if you have really skinny pictures, i.e. skinnier than the Kindle Fire, you might prefer to set the height instead of the width).

Chris McMullen

Author of A Detailed Guide to Self-Publishing with Amazon and Other Online Booksellers

  • Volume 1 on formatting and publishing
  • Volume 2 on marketability and marketing

Follow me at WordPress, find my author page on Facebook, or connect with me through Twitter.

Comments

Click here to jump to the comments section:

https://chrismcmullen.wordpress.com/2014/05/18/formatting-the-look-inside/#comments